Expense Module Overview
The Expense module has been created for the purpose of streamlining the process of Creating, Approving and Reviewing the Business Expenses incurred by employees. Earlier this used to be a manual process. Reimbursement will be as per the Finance policy.
Expense Module Users
The following individuals will be able to access the system.
1. Employees who want to submit an Expense: These are the users who will log in to the system and create the Expense claims.
2. Expense Approver: This will typically be the Reporting Manager of the employee or the person who has the authority to approve or
reject the Expenses incurred by the employee.
3. Finance Reviewer: This will be the Finance Expense Management team who will process the Expense payment.
Login Authentication
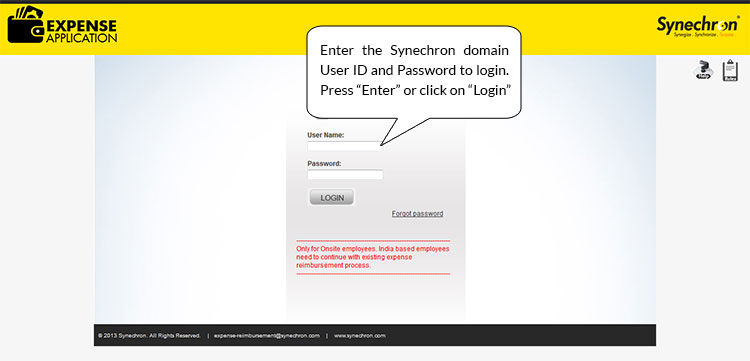
After successful authentication, the user will be redirected to the Landing Page. In case of invalid credentials, an error message will be displayed on the login screen.
Landing Page
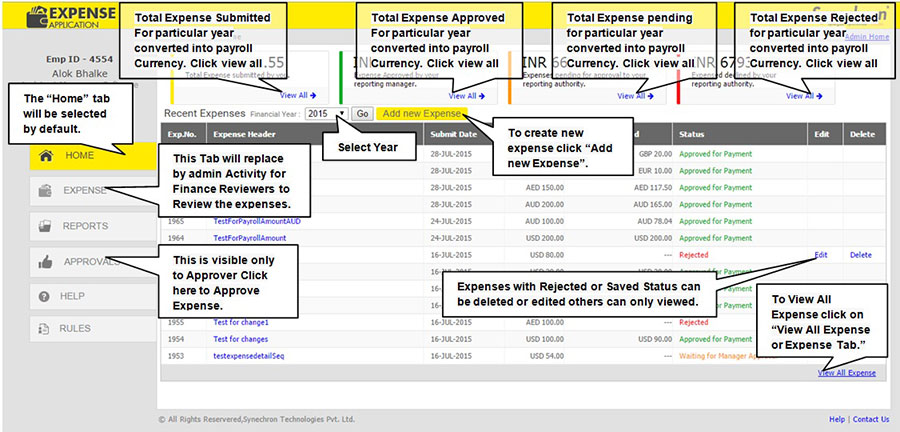
The Landing page has two tabs namely “Home”, “Expense”. Tabs would vary depending upon the role of the User.
Home Tab
a) Add new Expense ![]() This is visible to everyone.
This is visible to everyone.
b) Financial Year ![]() This is visible to everyone. User can view the expenses according financial year.
This is visible to everyone. User can view the expenses according financial year.
c) View all Expenses ![]() This is visible to everyone. The user click on Expense header, can view the detail information of Expenses created by self.
This is visible to everyone. The user click on Expense header, can view the detail information of Expenses created by self.
d) Submitted Expenses Box ![]() User can view total Submitted expense and converted Total amount in Payroll Currency.
User can view total Submitted expense and converted Total amount in Payroll Currency.
e) Approved Expenses Box ![]() User can view Approved Submitted expense and converted Total amount in Payroll Currency.
User can view Approved Submitted expense and converted Total amount in Payroll Currency.
f) Pending Expenses Box ![]() User can view Pending Submitted expense and converted Total amount in Payroll Currency.
User can view Pending Submitted expense and converted Total amount in Payroll Currency.
g) Rejected Expenses Box ![]() User can view Rejected Submitted expense and converted Total amount in Payroll Currency.
User can view Rejected Submitted expense and converted Total amount in Payroll Currency.
Add new Expense Button
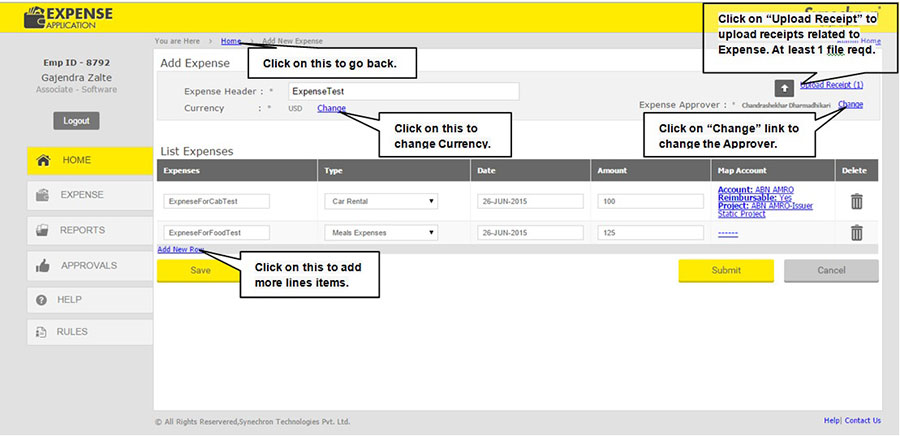
This is the screen where the User can create Expense claims and upload receipts related to the Expense. The Expense Header should be used to give high level information about the Expenses e.g. “ExpenseTest”
At the top of the screen, the default Expense Approver for the user is displayed. The default Approver is the Reporting Manager. The user has the option to change the Approver by clicking on the “Change” link. The new Approver can be selected by providing the Email id.
The user can then fill in the other details and select the appropriate currency (“USD” is the default). New Rows for entering Expense can be added by clicking on “Add New Row” link. The user can click on “Upload File” link and attach the receipts related to the Expenses. Please note that at least one receipt is mandatory to be attached with each new Expense form created. Files up to 4MB (each) can be attached.
The “Save” button saves the Expense claim which can be later modified by the user. On click of the “Submit” button, the Expense will be sent to the Approver for approval. Once an Expense form is submitted, it cannot be modified by the User. The “Cancel” button takes the user back to the Landing page.
Separate Expense report should be submitted for different currencies.
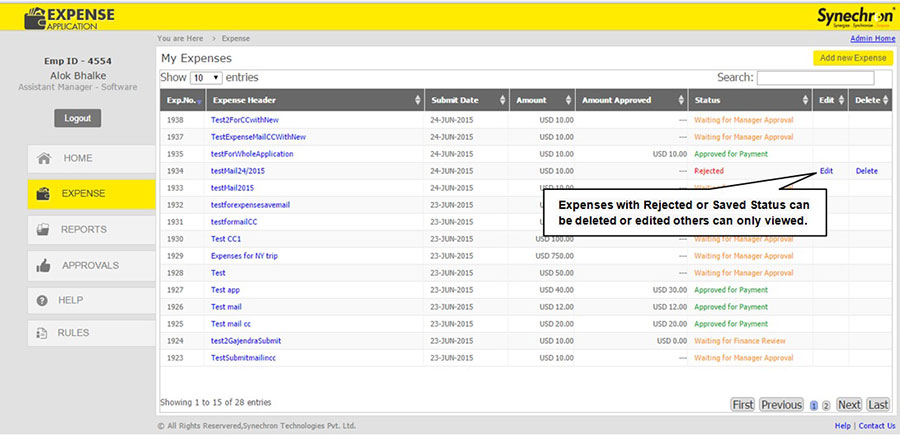
View Expense
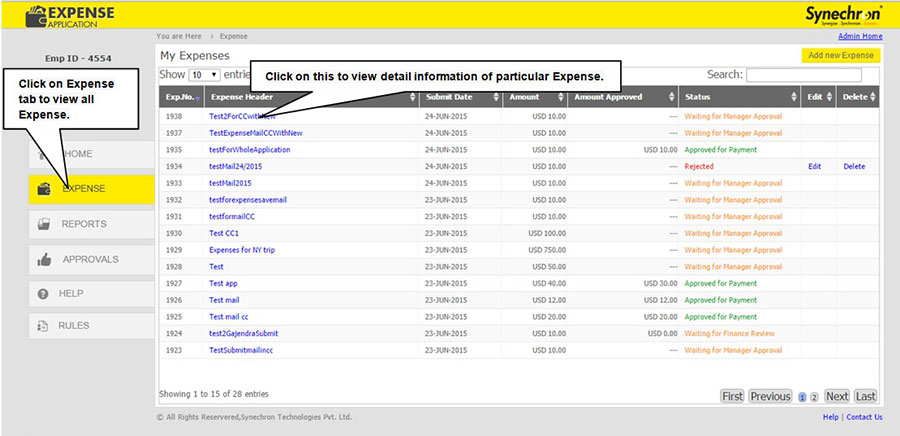
The user can view the Expenses created by self. Status of each Expense form is also displayed. The Expenses which are in Saved and Rejected status can be Edited and Deleted as well. Other Expenses can only be viewed.
Rejected Expense
This menu item is visible only when there is at least one Expense claim which has been rejected by the Approver. The rejection comments are also visible.
The user can click on the “Edit” button, modify the Expense claim and resubmit it or can delete the Expense from the list.
Approve Expense
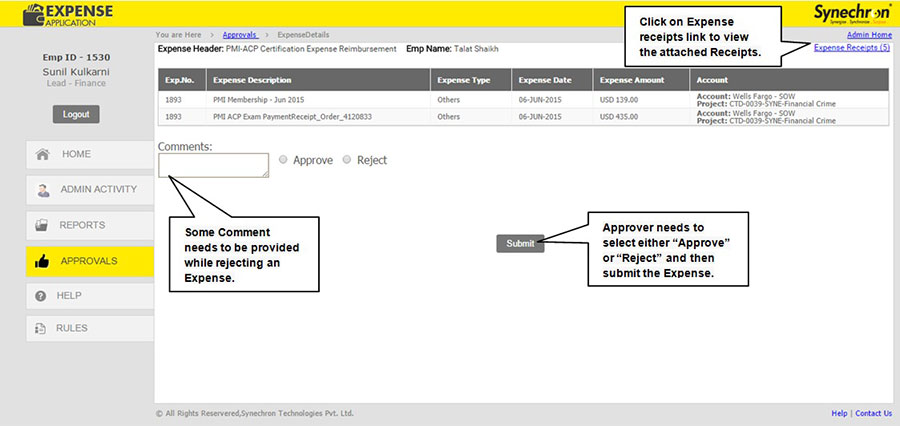
Once the Expense form is submitted by the employee, it goes to the Approver for Approval. The Approver can click on the “Approve Expenses” link to see the list of Expenses pending for approval.
The Approver has the option to either Approve or Reject the Expense form by selecting the appropriate radio button. Comments are mandatory in case the Expense form is rejected but optional in case the Approver chooses to approve the Expenses.
If the Expense form is rejected, it goes back to the user who can take the appropriate action. Approved Expenses go to the Finance Reviewer.
Review Expense
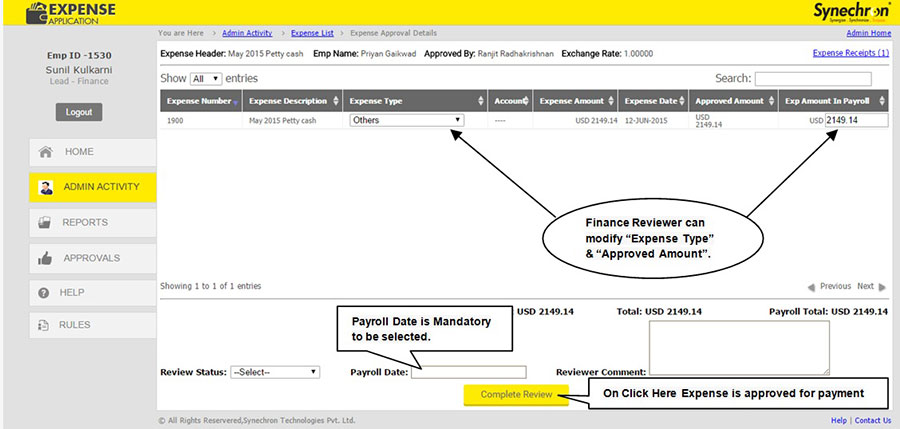
Once the Expense is approved by the Approver, it goes to the Finance Reviewer for the final review. The Finance Reviewer has the authority to change the Approved Amount as well as the Expense Type which was initially entered by the user.
The Finance Reviewer needs to select the Payroll Date as well, before clicking on the “Complete Review” button. Payroll Date is the date on which the user account will be credited with the approved amount. Comments are mandatory in case the Expense Review team changes the Approved amount.
Reports

Report Tab
The Reports tab lists the reports which are available for the user. Reports are currently available only for approving Managers and the Finance Review team.
Reports for Employees: None at present
Reports for Approving Managers
1. Expenses for Approval![]() This is visible only to Approving Managers. It will list the Expense claims which are pending for approval as well as the Expense claims approved in the past.
This is visible only to Approving Managers. It will list the Expense claims which are pending for approval as well as the Expense claims approved in the past.
Reports for the Finance Review team
1. Expense Report by Expense header ![]() It will list the Expense Headers for the given period.
It will list the Expense Headers for the given period.
2. Expense Report by Expense details ![]() It will list the Expense details for the given period.
It will list the Expense details for the given period.
3. Expense Report by Reimbursable details ![]() It will list the Expense Reimbursable details for the given period.
It will list the Expense Reimbursable details for the given period.
4. Expense Report by Expense Type details ![]() It will list the Expense details for the given period.
It will list the Expense details for the given period.
5. Expense Report by Employee Name details ![]() It will list the Employee Name details for the given period.
It will list the Employee Name details for the given period.
Expenses for Approval Report
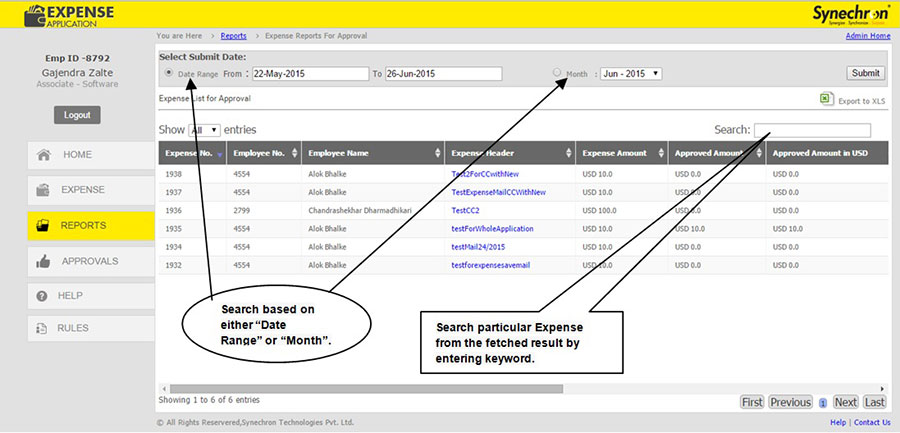
This report is visible only to Approvers who have Expense claims which are pending for approval or who have approved/rejected at least one Expense claim in the past.
The report displays all the records for which the logged in Approver has taken any action or needs to take some action.
While searching for the records, the user has option to either provide a date range or select any particular month. Once the data is displayed on the screen in tabular form, any particular record can be searched by providing the search string in “Search” text box. The records can be sorted on any column as well. Also by clicking on “Export to XLS” link, the data can be viewed or saved in excel format.
Expense Report by Expense Header
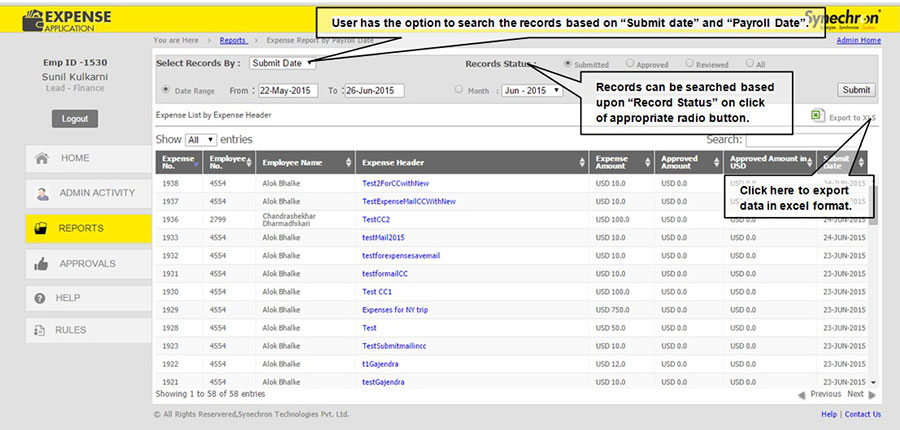
This report is visible only to the Finance Reviewers. The report displays data based on the Expense header and provides a summary of the Expenses. Expense details are not included on this report.
The report displays all the records based on either Submit Date or Payroll Date. The user has the option to either provide a date range or select any particular month. The Expense status can also be selected as an input parameter.
Once the data is displayed on the screen in the tabular form, any particular record can be searched by providing the search string in “Search” text box. The records can be sorted on any column as well. Also by clicking on “Export to XLS” link, the data can be viewed or saved in excel format.
Expense Report by Expense Details
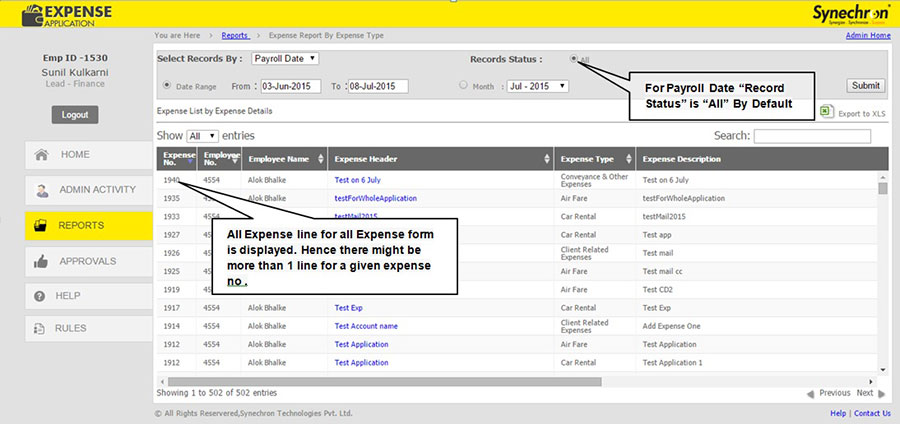
This report is visible only to the Finance Reviewers. The report displays data based on the Expense header and there is separate row for each line item of the Expense in the displayed records.
The report displays all the records based on either Submit Date or Payroll Date. The user has the option to either provide a date range or select any particular month. The Expense status can also be selected as an input parameter.
Once the data is displayed on the screen in the tabular form, any particular record can be searched by providing the search string in “Search” text box. The records can be sorted on any column as well. Also by clicking on “Export to XLS” link, the data can be viewed or saved in excel format.
Expense Report by Expense Type
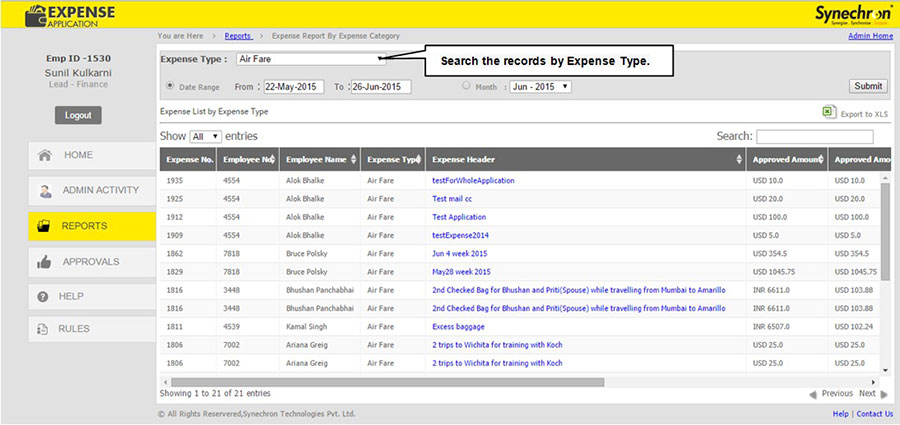
This report is visible only to the Finance Reviewer. This report displays all the records based on Submit Date or Payroll Date. It is based on Expense details and there is separate row for each line item of the expense in the displayed records
While searching for the records, the user has option to either provide a date range or select any particular month. Once the data is displayed on the screen in tabular form, any particular record can be searched by providing the search string in “Search” text box. The records can be sorted on any column as well. Also by clicking on “Export to XLS” link, the data can be viewed or saved in excel format.
Expense Report by Employee Name
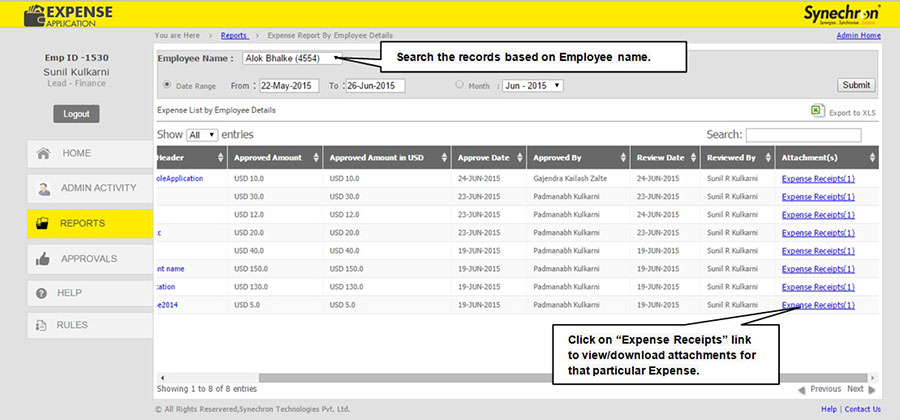
This report is visible only to the Finance Reviewer. The reviewer can select any employee from the “Employee Name” dropdown and select a date range or month to view the employee’s expenses submitted for that particular date range/month.
The “Attachment(s)” column displays the number of receipts attached while creating that expense. On click of the “Expense Receipts()” link, the user is taken to a popup which shows all the attachments for that expense. These attachments can be saved or downloaded by the user. Also any particular record can be searched by providing the search string in “Search” text box. The records can be sorted on any column as well. On click of “Export to XLS” link, the data can be viewed or saved in excel format.